Tuesday, December 30, 2008
New Wonderland Kit from Digi Designs by Nicole
There is also a nice set of four free InstaScrap pages that match this kit.
Click on the picture to be taken to where you can download this freebie.
Saturday, December 27, 2008
Let Me Count the Ways...
1. The Gallery - There are so many ways to explore the gallery. If you want to see the best of the best check out the Top 100 layouts of 2007 . Use the search function if you are looking for something specific, for example I entered digital and came up with 1029 layouts. There is even a section dedicated to sketches.
2. The Store - Whether you are a paper or a digi scrapper there is something to appeal to you in the KC Store. Our digital designers have created over 65 kits in a variety of styles for you to download. On the paper side the store now has KC exclusive chipboard and flowers. And don't forget to check out the Clearance and Last Chance Clearance sections, there are some great bargains to be had.
3. The Forum - This is what attracted me to KC originally. The members have changed over the last few years, but it still is the most welcoming forum I visit. I love that we have paper scrappers, digi scrappers, hybrid scrappers and card makers and everyone is supportive of each other. My favourite sections are Scrapbooking Chat, KC Cafe and DT Challenges.
What ways does Kindred Creations inspire you?
Get those Christmas Pictures into Layouts!
Looking to get a few layouts done fast? Try our free Love and Joy InstaScraps from Digi Designs by Nicole. Click on the picture to be taken to where you can download it. Be sure to check out the kit that goes with it as well.
You can also participate in our challenges in the forum. When you participate in the Design Team Challenges, you get inspiration and a chance to have your layout displayed on the front page.
Monday, December 22, 2008
All Boy InstaScraps Freebie
Friday, December 19, 2008
Template Challenge #1
Everyone who participates in this template challenge will get a FREE mini kit called 'Holidays Wish' from me. Take a look at this cute mini kit you'll get for participating!
And this is the template you are to use. Pretty simple huh!
Here is my layout I created using the template. I just added a few additional embellishment touches, and viola, I was done.
If you want to participate too, and for more information, go here. I can't wait to see your layouts! Hurry though, deadline is January 3rd!
Tuesday, December 16, 2008
Reflection InstaScrap Freebie
Friday, December 12, 2008
Perfect Pieces Digital Freebie
Thursday, December 11, 2008
November DT picks
Wednesday, December 10, 2008
A little Christmas present
I created them in 2 formats, the first is a printable for those who want to keep things simple or are less digital savvy. Please click on the preview to take you to the download location.
The second set is made up of individual jpg files for you to resize/alter and print as you would like. Please click on the preview to take you to the download location.
If you really enjoy the tags the complementary 'Christmas Memories' kit is available to purchase in the store for only $2. There are also many more freebies available both in the store and on the forum.
I wish you all a wonderful Christmas.
Monday, December 8, 2008
Basic Grey All About Me Kits 2009
Each kit is $18 and you get patterned papers and cardstock from their absolutely newest lines, as well as the embellishments that go with them. The kit also comes with a 2 page sketch and photo step-by-step instructions on how to do the layout (the kit makes more than 1 2 page spread though). At the end of the year all 12 participants would recieve a 13th kit for free!
When you sign up you agree to pay for all twelve kits. You will recieve a recurring bill each month in your email from Kindred Creations for the kit cost + shipping.
Each 2 page spread has a theme:
My Favorite Things
Betcha Didn't Know
This I Believe
A Life Changing Moment
Reveal the Real You
My Circle of Friends
When I was a Kid
I Am Unique
Who Inspires Me
A Letter to Myself + the surprise 13th bonus kit.
I've seen the beautiful papers and embellishments, they are gorgeous! What else would you expect from BasicGrey. Unfortunately they will only let me show you the sample layout for the first month.
Interested? Sign up here
Thursday, December 4, 2008
12 Days of Christmas
On the first day of Christmas my true love gave to me 1 pinwheel garland.
On the second day of Christmas my true love gave to me 2 ways to do a gift card holder.
On the third day of Christmas my true love gave to me 3 Fresh Fonts.
On the fourth day of Christmas my true love gave to me 4 items to create a Tic Tac deck.
On the fifth day of Christmas my true love gave to me 5 napkin rings.
On the sixth day of Christmas my true love gave to me 6 globe ornaments.
On the seventh day of Christmas my true love gave to me 7 elements for a LO.
On the eight day of Christmas my true love gave to me 8 glittery snow scene cards.
On the ninth day of Christmas my true love gave to me 9 Christmas Titles.
On the tenth day of Christmas my true love gave to me 10 inches of white space on a LO.
On the eleventh day of Christmas my true love gave to me 11 ways to wrap a candy bar.
On the twelth day of Christmas my true love gave to me 12 months of calendar pages.
Monday, December 1, 2008
Get Huge Discounts on Supplies!
Tuesday, November 18, 2008
Thanksgiving and Fall Inspiration
Saturday, November 15, 2008
October DT picks
Remember the only way your LO can make it to this slideshow is to participate in the monthly DT challenges. Good luck to this months participants.
Wednesday, November 12, 2008
If you love hand-stitching on your layouts, here's a storage solution.
So here's some directions on how I made mine:
Take a 2"x10" strip of cardstock weight patterned paper, and fold it at 1", 5 1/2" and at 5 3/4". Fold this into a matchbook shape. Next, take a 2"x4 1/2" strip of thin boxboard, and glue it to the inside back of the matchbook for added support. Next take a 2"x4 1/2" piece of cardstock and fold it at 1 1/2" and at 2 1/4". Pierced the fold lines at even intervals with a small/thin needle. Tuck the longer end (to the fold line) into the small flap of the matchbook. Fold the large flap under the smaller one; staple the small flap closed, making sure you don't catch the top flap. Decorate as desired, and then insert the needles through the pierced holes.
Have fun sewing on your layouts.
Sunday, November 9, 2008
Lose Weight Without Dieting
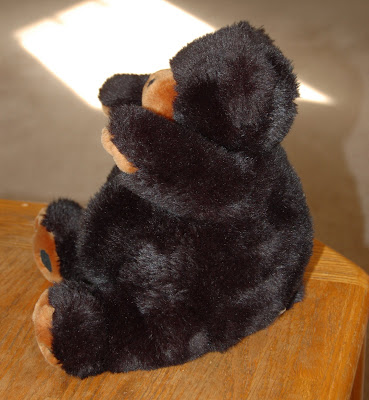
Here is a quick, down and dirty way to slim him down...
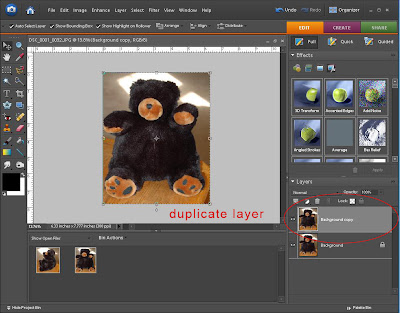
deselect your original layer so it is now hidden, then with your selection tool move the sides in - just a bit... not too much or your image will looked "squished". Just enough to shave off a bit of bulge!
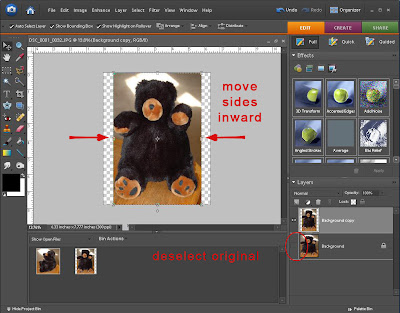
Here is another way... great for arms and profile shots...
Hey Mr. Fat Bear... how's it going?
With your lasso tool, select area for slimming
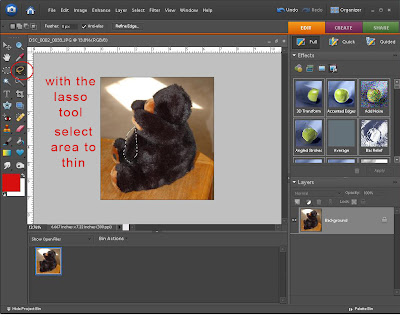
Go to your filter gallery and find "liquify"
Now for my finished product, I slimmed his hind end too a bit. I did find that I had to "clean up" my background a bit, because his fur left me some "messies"...
Meet the new and improved Mr. Fat Bear!
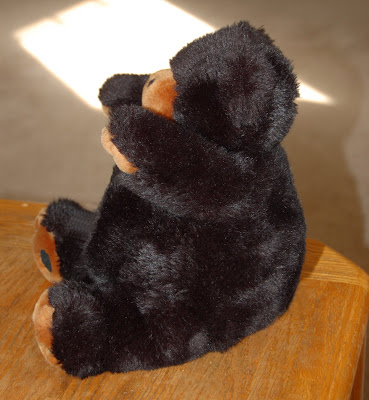
With a bit of patience and a bit of time you can master this technique... on people its easier... no fur to deal with!
Monday, November 3, 2008
One of KC's latest freebies
Wednesday, October 29, 2008
Spetember DT picks
Remember the only way your LO will make it to the blog is by participating in the DT challenges, so head on over to the forum and see what kind of exciting challenges we have for you this month.
Tuesday, October 28, 2008
A Digital Freebie
If you enjoyed this freebie there are even more of them in the Freebies board on the forum as well as the Kindred Creations Store. Don't forget to check them out!
Monday, October 27, 2008
Colour
Here is a palette I put together for Halloween.
And here is how I used those colours in a layout.
Now go visit the Kuler site, create a palette of your own and then use it as inspiration for a new layout. Don't forget to post it in the Kindred Creations gallery for us to look at!
Tuesday, October 21, 2008
Text In A Circle
In Microsoft word (2000 and up):Open a new document.
1. From the top tool bar choose ‘Insert' --‘Picture’-- ‘Word Art’ OR click on the WordArt icon from the bottom tool bar (the tilted blue A)
2. Click on the sample that looks like an arch (in my program, it is the third on the top); click okay.
3. Type in the text you want. You can change font and size here. *indent one space at the beginning of your type. Click ‘okay’
4. This will display it in your document…click on the image so the box forms around it. Your WordArt tool bar should be visible now.
5. On the tool bar there is an “abc” icon…when the cursor is over it, it should read “WordArt shape”
6. When you click on this, you can see several different shapes…click on the one that looks like the letter O…once you do this, your text will look a little bit squashed…just resize it like you would any other image. To make a perfect circle-- right click on your image--choose Format WordArt--Size--and change the width and height so they are the same. * You can make your circle the exact size of your punch, circle etc. by measuring them before hand and inserting those measurements.
( I wanna thank Skrapnfreak for posting these for me to copy over here! )
Wednesday, October 15, 2008
Re-use it!
Pop Tops
These fun items can be used a number of ways.
*To make what looks like a belt with some ribbon and the soda pop top as the "buckle"
*As a clasp on a mini-album. You bend the pop top so that the wider circle goes over the side and then glue the other side to the front of the album. Use ribbon to tie it shut. Or use two pop tops put the second one on the back page of the mini album and use a small peice of ribbon to tie them shut.
Clock Handles
I've seen these all over the place. People use them like arrows. They look great on heritage layouts.
Saran Wrap
If you wad it up and dip it on a stamp pad it makes a great texture background. I use this all the time when I have a color that I want to use in a stamp pad, but I don't have paper that will match. It takes about 3 minutes to cover a whole 12x12 page.
Here is a layout where I used saran wrap to make the background texture:
Beads
These are another great thing to use, and there are lots of kinds of beads you can get that won't make your page too lumpy. Here is one way I have used beads.
Saturday, October 4, 2008
August DT picks
Tuesday, September 30, 2008
Fall Photography
Ever wonder how they get those bright and beautiful fall pictures done? Well, it's pretty easy.
Bright sunlight on a fall day is best, especially to make the colors "pop". If you are doing landscape photos make sure you are using a smaller aperture (f16 or above) to create a huge depth of field. Make sure you aren't taking pictures in haze or overcast skies too. Haze acts like a filter and stops the light from entering the lens.
Next time you are out, try it. Have fun playing!
Hobble Creek Canyon, Utah
Wednesday, September 17, 2008
Cropping Style
In this version, I added a bit of contrast and cropped just a bit. Enough crop to get rid of the other "partial person" in the shot and the contrast was enough to pop her eye color
This is where most people stop the crop. Having your subjects fill the frame...
nice huh???
But let's take it a step further...
I ran an action to soften mom's pores, because this close of a crop you can really see them but you also get an awesome shot of this kids eyes, with out losing mom's kiss!
So next time you are sitting with bunches of photos to scrap try cropping a bit more than you'd normally do... you may really like the results!
Here is a tip for paper scrappers: If you are working with actual photos, as opposed to pixels, try using strips of paper to cover areas of your photos , as a way to "try on" a crop.
Happy Scrapping!
Saturday, September 6, 2008
Waking up your photos
My neighbor's tree starts to come to life in the morning sun...
a child's toy gains interest
even human subjects benefit from the rays of a sunrise
so give this a try... either catch a romantic sunset or set your alarm to catch a glorious sunrise, and don't forget to have your camera handy to get some amazing natural light!
Thursday, September 4, 2008
Inspiration all around
Recently however I've added another quick method of capturing the source of my inspiration... my cell phone camera! I always thought it was a pretty useless feature since the image really isn't big enough to capture anything considering it is only 480x640 pixels, not much bigger than an index print. However I've been finding that it makes a great note pad! If an image doesn't do the trick you could always draft a text message to yourself. This spring I found a beach bag that had great design, texture, and stitching that would relate well to some patterned paper I had, and create the basis of a layout. I grabbed a pen and receipt and doodled away, but now I would just grab my camera and snap a quick picture to jog my memory when I get home. Sometimes I run into a great quote, I could snap a quick picture much faster than I could copy it down. No longer do you need to rip that magazine page out of the magazine at the doctors office (doesn't it bug you when people have done that to part of an article you really wanted to read!)
However you record your inspiration, I just want to encourage you to keep looking around you, you will find inspiration for your next layout!