I've seen these instructions posted in numerous places, so thought it would be good to share here as well. It's awesome to see it done on a page!!
In Microsoft word (2000 and up):Open a new document.
1. From the top tool bar choose ‘Insert' --‘Picture’-- ‘Word Art’ OR click on the WordArt icon from the bottom tool bar (the tilted blue A)
2. Click on the sample that looks like an arch (in my program, it is the third on the top); click okay.
3. Type in the text you want. You can change font and size here. *indent one space at the beginning of your type. Click ‘okay’
4. This will display it in your document…click on the image so the box forms around it. Your WordArt tool bar should be visible now.
5. On the tool bar there is an “abc” icon…when the cursor is over it, it should read “WordArt shape”
6. When you click on this, you can see several different shapes…click on the one that looks like the letter O…once you do this, your text will look a little bit squashed…just resize it like you would any other image. To make a perfect circle-- right click on your image--choose Format WordArt--Size--and change the width and height so they are the same. * You can make your circle the exact size of your punch, circle etc. by measuring them before hand and inserting those measurements.
( I wanna thank Skrapnfreak for posting these for me to copy over here! )





Tuesday, October 21, 2008

Wednesday, October 15, 2008
Re-use it!
I have seen some ingenius ways to use common household items on a scrapbook page and they really help me get inspired, so I thought I would share a few.
Pop Tops
These fun items can be used a number of ways.
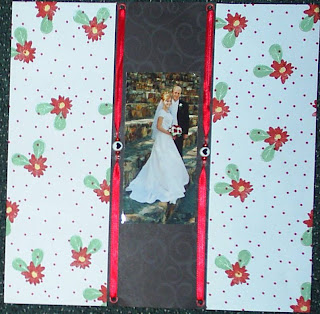
*To make what looks like a belt with some ribbon and the soda pop top as the "buckle"
*As a clasp on a mini-album. You bend the pop top so that the wider circle goes over the side and then glue the other side to the front of the album. Use ribbon to tie it shut. Or use two pop tops put the second one on the back page of the mini album and use a small peice of ribbon to tie them shut.
Clock Handles
I've seen these all over the place. People use them like arrows. They look great on heritage layouts.
Saran Wrap
If you wad it up and dip it on a stamp pad it makes a great texture background. I use this all the time when I have a color that I want to use in a stamp pad, but I don't have paper that will match. It takes about 3 minutes to cover a whole 12x12 page.
Here is a layout where I used saran wrap to make the background texture:

Beads
These are another great thing to use, and there are lots of kinds of beads you can get that won't make your page too lumpy. Here is one way I have used beads.
Pop Tops
These fun items can be used a number of ways.
*To make what looks like a belt with some ribbon and the soda pop top as the "buckle"
*As a clasp on a mini-album. You bend the pop top so that the wider circle goes over the side and then glue the other side to the front of the album. Use ribbon to tie it shut. Or use two pop tops put the second one on the back page of the mini album and use a small peice of ribbon to tie them shut.
Clock Handles
I've seen these all over the place. People use them like arrows. They look great on heritage layouts.
Saran Wrap
If you wad it up and dip it on a stamp pad it makes a great texture background. I use this all the time when I have a color that I want to use in a stamp pad, but I don't have paper that will match. It takes about 3 minutes to cover a whole 12x12 page.
Here is a layout where I used saran wrap to make the background texture:

Beads
These are another great thing to use, and there are lots of kinds of beads you can get that won't make your page too lumpy. Here is one way I have used beads.

Saturday, October 4, 2008
August DT picks
Here are the August Design Team picks! Congratulations ladies, this was once again an EXTREMELY close vote!


Tuesday, September 30, 2008
Fall Photography
I love fall! I love when the leaves start changing colors. Aren't they pretty? My favorite part of fall is going up in the mountains and taking pictures of the fall scenery.
Ever wonder how they get those bright and beautiful fall pictures done? Well, it's pretty easy.
Bright sunlight on a fall day is best, especially to make the colors "pop". If you are doing landscape photos make sure you are using a smaller aperture (f16 or above) to create a huge depth of field. Make sure you aren't taking pictures in haze or overcast skies too. Haze acts like a filter and stops the light from entering the lens.
Next time you are out, try it. Have fun playing!
 Hobble Creek Canyon, Utah
 Hobble Creek Canyon, Utah
Ever wonder how they get those bright and beautiful fall pictures done? Well, it's pretty easy.
Bright sunlight on a fall day is best, especially to make the colors "pop". If you are doing landscape photos make sure you are using a smaller aperture (f16 or above) to create a huge depth of field. Make sure you aren't taking pictures in haze or overcast skies too. Haze acts like a filter and stops the light from entering the lens.
Next time you are out, try it. Have fun playing!
 Hobble Creek Canyon, Utah
 Hobble Creek Canyon, Utah
Wednesday, September 17, 2008
Cropping Style
Crop or not to crop your photos...
I crop most of my photos some of the I crop a lot more than others. I do this to give added interest to my pages. I really try to ensure that my photos, and not all of the peripherals, are the most memorable part of my page. And some times to achieve this I have to crop!
Here is a cute photo of my husbands cousin with her daughter... isn't she the cutest? Straight out of the camera it's nice, but I want more umph!

In this version, I added a bit of contrast and cropped just a bit. Enough crop to get rid of the other "partial person" in the shot and the contrast was enough to pop her eye color

This is where most people stop the crop. Having your subjects fill the frame...

nice huh???
But let's take it a step further...

I ran an action to soften mom's pores, because this close of a crop you can really see them but you also get an awesome shot of this kids eyes, with out losing mom's kiss!
So next time you are sitting with bunches of photos to scrap try cropping a bit more than you'd normally do... you may really like the results!
Here is a tip for paper scrappers: If you are working with actual photos, as opposed to pixels, try using strips of paper to cover areas of your photos , as a way to "try on" a crop.
Happy Scrapping!
Saturday, September 6, 2008
Waking up your photos
I am, by nature, an early riser. I am usually roused by the sun peeking through the shades... which has been a great help in my photography... the natural light from either a sunrise or sunset really lends its self well to a beautiful finished photo.
My neighbor's tree starts to come to life in the morning sun...
My neighbor's tree starts to come to life in the morning sun...

a child's toy gains interest

even human subjects benefit from the rays of a sunrise

so give this a try... either catch a romantic sunset or set your alarm to catch a glorious sunrise, and don't forget to have your camera handy to get some amazing natural light!
Thursday, September 4, 2008
Inspiration all around
If you're like me you find scrapbook inspiration all around you. A great quote, design, product, technique or sketch may come to mind no matter where I am, or what I'm doing. Sometimes I have a pen and paper handy, other times unfortunately I have nothing handy and I might lose the idea. I have ideas scrawled on every imaginable piece of paper, especially shopping receipts in my purse, or a paper towel from the barn. My desk pad calendar is full of little notes to remember, ideas, doodles/scribbles, and calculations! I really should organize some of them into a proper notebook organized into categories. I have sketches from a number of years ago that I fully intend to scrap; they may not end up exactly the same as I may have imagined them at their inception, my scrapping style has grown and changed, as well as my scrapping stash.
Recently however I've added another quick method of capturing the source of my inspiration... my cell phone camera! I always thought it was a pretty useless feature since the image really isn't big enough to capture anything considering it is only 480x640 pixels, not much bigger than an index print. However I've been finding that it makes a great note pad! If an image doesn't do the trick you could always draft a text message to yourself. This spring I found a beach bag that had great design, texture, and stitching that would relate well to some patterned paper I had, and create the basis of a layout. I grabbed a pen and receipt and doodled away, but now I would just grab my camera and snap a quick picture to jog my memory when I get home. Sometimes I run into a great quote, I could snap a quick picture much faster than I could copy it down. No longer do you need to rip that magazine page out of the magazine at the doctors office (doesn't it bug you when people have done that to part of an article you really wanted to read!)
However you record your inspiration, I just want to encourage you to keep looking around you, you will find inspiration for your next layout!
Recently however I've added another quick method of capturing the source of my inspiration... my cell phone camera! I always thought it was a pretty useless feature since the image really isn't big enough to capture anything considering it is only 480x640 pixels, not much bigger than an index print. However I've been finding that it makes a great note pad! If an image doesn't do the trick you could always draft a text message to yourself. This spring I found a beach bag that had great design, texture, and stitching that would relate well to some patterned paper I had, and create the basis of a layout. I grabbed a pen and receipt and doodled away, but now I would just grab my camera and snap a quick picture to jog my memory when I get home. Sometimes I run into a great quote, I could snap a quick picture much faster than I could copy it down. No longer do you need to rip that magazine page out of the magazine at the doctors office (doesn't it bug you when people have done that to part of an article you really wanted to read!)
However you record your inspiration, I just want to encourage you to keep looking around you, you will find inspiration for your next layout!
Subscribe to:
Posts (Atom)