Thank you to all the ladies who participated in our '12 Days of Christmas' crop. I had an awesome time. My scrap space was a disaster from all the scrapping I managed to do! For those of you who missed it I thought I would give you a peak of some of the projects that were done at the crop. If you want to try some of these projects yourself you can head to the Cropping Lounge ... don't forget to share your beautiful creations with us in the cropping lounge and in the post where you found the idea.
On the first day of Christmas my true love gave to me 1 pinwheel garland.
On the second day of Christmas my true love gave to me 2 ways to do a gift card holder.
On the third day of Christmas my true love gave to me 3 Fresh Fonts.
On the fourth day of Christmas my true love gave to me 4 items to create a Tic Tac deck.
On the fifth day of Christmas my true love gave to me 5 napkin rings.
On the sixth day of Christmas my true love gave to me 6 globe ornaments.
On the seventh day of Christmas my true love gave to me 7 elements for a LO.
On the eight day of Christmas my true love gave to me 8 glittery snow scene cards.
On the ninth day of Christmas my true love gave to me 9 Christmas Titles.
On the tenth day of Christmas my true love gave to me 10 inches of white space on a LO.
On the eleventh day of Christmas my true love gave to me 11 ways to wrap a candy bar.
On the twelth day of Christmas my true love gave to me 12 months of calendar pages.
Thursday, December 4, 2008
Monday, December 1, 2008
Get Huge Discounts on Supplies!
Auction going on today in the forum. If you are looking for a great deal check it out. All items for auction will have a cap so you won't pay more than the wholesale price (50% off) even if you are the last bidder!
Tuesday, November 18, 2008
Thanksgiving and Fall Inspiration
I love Thanksgiving decor and fall colors. So I thought I would share some wonderful ideas I've seen for Thanksgiving table settings, placecards and Layouts. Aren't they beautiful? I hope this gives you some ideas and motivation.
Saturday, November 15, 2008
October DT picks
We had another great round of DT challenges, and we want to thank all of you for participating! However only one LO from each challenge can be chosen for a Design Team pick. You ladies make it tough on us, and even more so when we choose the overall winner. Once again it was a close race!
Remember the only way your LO can make it to this slideshow is to participate in the monthly DT challenges. Good luck to this months participants.
Wednesday, November 12, 2008
If you love hand-stitching on your layouts, here's a storage solution.
I created a little matchbook to store some of my sewing needles with my scrapping supplies. I did have them stored in a little box, but the lid wasn't too secure so that they might spill easily and it was rather difficult to remove them without accidentally poking myself.

So here's some directions on how I made mine:
Take a 2"x10" strip of cardstock weight patterned paper, and fold it at 1", 5 1/2" and at 5 3/4". Fold this into a matchbook shape. Next, take a 2"x4 1/2" strip of thin boxboard, and glue it to the inside back of the matchbook for added support. Next take a 2"x4 1/2" piece of cardstock and fold it at 1 1/2" and at 2 1/4". Pierced the fold lines at even intervals with a small/thin needle. Tuck the longer end (to the fold line) into the small flap of the matchbook. Fold the large flap under the smaller one; staple the small flap closed, making sure you don't catch the top flap. Decorate as desired, and then insert the needles through the pierced holes.
Have fun sewing on your layouts.
Take a 2"x10" strip of cardstock weight patterned paper, and fold it at 1", 5 1/2" and at 5 3/4". Fold this into a matchbook shape. Next, take a 2"x4 1/2" strip of thin boxboard, and glue it to the inside back of the matchbook for added support. Next take a 2"x4 1/2" piece of cardstock and fold it at 1 1/2" and at 2 1/4". Pierced the fold lines at even intervals with a small/thin needle. Tuck the longer end (to the fold line) into the small flap of the matchbook. Fold the large flap under the smaller one; staple the small flap closed, making sure you don't catch the top flap. Decorate as desired, and then insert the needles through the pierced holes.
Have fun sewing on your layouts.
Sunday, November 9, 2008
Lose Weight Without Dieting
How many times have you read that??? A kazillion? Well, in this post, I will attempt to show you how to shave off a few unwanted pounds with the magic of photo editing!
Here is a quick, down and dirty way to slim him down...


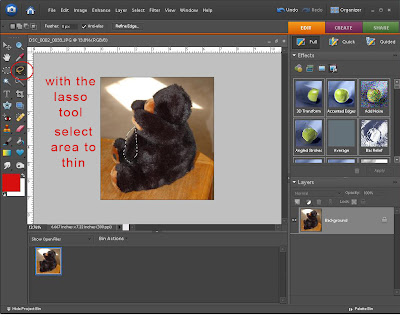
Once there, your view changes, just to the area you have selected. Size your brush in accordance to your photo size. Here my brush size is 64 pixels. Move your brush in an upward - inward motion.
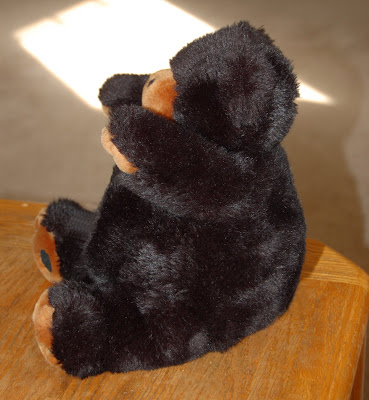
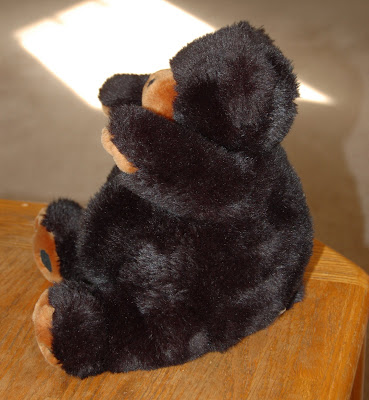
Meet Mr. Fat Bear. That's his name, I didn't give it to him... we call him Fat Bear for short..
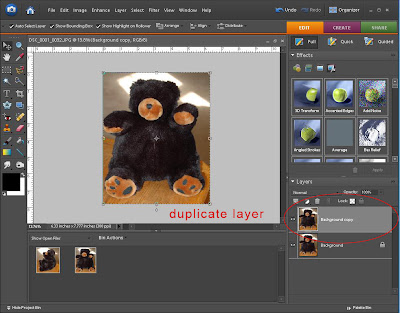
duplicate your layer
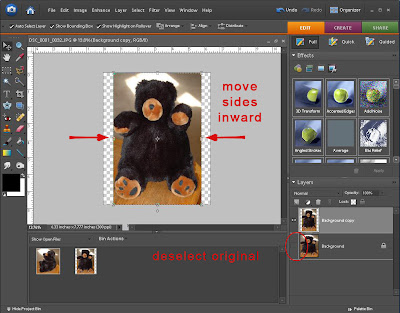
deselect your original layer so it is now hidden, then with your selection tool move the sides in - just a bit... not too much or your image will looked "squished". Just enough to shave off a bit of bulge!
Here is another way... great for arms and profile shots...
Hey Mr. Fat Bear... how's it going?
With your lasso tool, select area for slimming
Go to your filter gallery and find "liquify"
Now for my finished product, I slimmed his hind end too a bit. I did find that I had to "clean up" my background a bit, because his fur left me some "messies"...
Meet the new and improved Mr. Fat Bear!

With a bit of patience and a bit of time you can master this technique... on people its easier... no fur to deal with!
Monday, November 3, 2008
One of KC's latest freebies
Subscribe to:
Posts (Atom)